

Become a pirate legend by learning how to solve the tricky riddles of the Tall Tales.
The Shores of Gold Tall Tale comprises 9 separate voyages.
- Totem Cheat Sheet
- Shroudbreaker
- The Cursed Rogue
- The Legendary Storyteller
- Stars of a Thief
- The Wild Rose
- The Art of the Trickster Riddles
- The Fate of the Morningstar Riddles
- Revenge of the Morningstar
- Shores of Gold
The first voyage is the Shroudbreaker voyage, which kicks off the entire adventure. Each voyage can take anywhere between two and three hours, depending on your crew, how aggressive other players are, and how quickly you try to complete each step.
Because this is the first voyage of its kind in Sea of Thieves, it’s definitely worth taking your time to soak up the atmosphere!
How to Start the Tall Tales in Sea of Thieves
Once you reach the endpoint of each mission, the primary character you dealt with at the start of the mission will typically inform you where to find the next voyage. For example, after completing the Shroudbreaker, the Mysterious Stranger will reveal that Madame Olivia at Plunder Outpost might know something.
However, there are some instances where you are given little information from the quest-giver. To work out where to go next, follow this guide or open up the Tall Tale, highlight the voyage you want, and press the “more information” button.
The first time you play the Shores of Gold Tall Tale you will have to complete it in sequence. Once you play through the entire Tall Tale, you can launch any voyage at any time. When you first begin, you may find journals out in the wild that you cannot interact with, this is because you have yet to complete the previous voyages.
Sea of Thieves Totem Cheat Sheet
Here’s a cheat sheet for the Sea of Thieves totems you receive across all of the main missions in Tall Tales – you’re going to need to consult this later.
These Totems can only be acquired as a part of either The Shroudbreaker, Stars of a Thief or The Art of the Trickster Tall Tale.
These Totems are the size of Trinkets and can be carried in Container Chests. Each of these Totem Keys will unlock the respective Totem Vault. The Keyholes are square shaped carvings hidden among rocks with nearby respective Totem Cave Paintings.
Totem Keys are only useful for the Crew attempting the Tall Tale and cannot be sold to any Trading Company. Once the Totem Key is lost or sunk, the Tall Tale will fail.
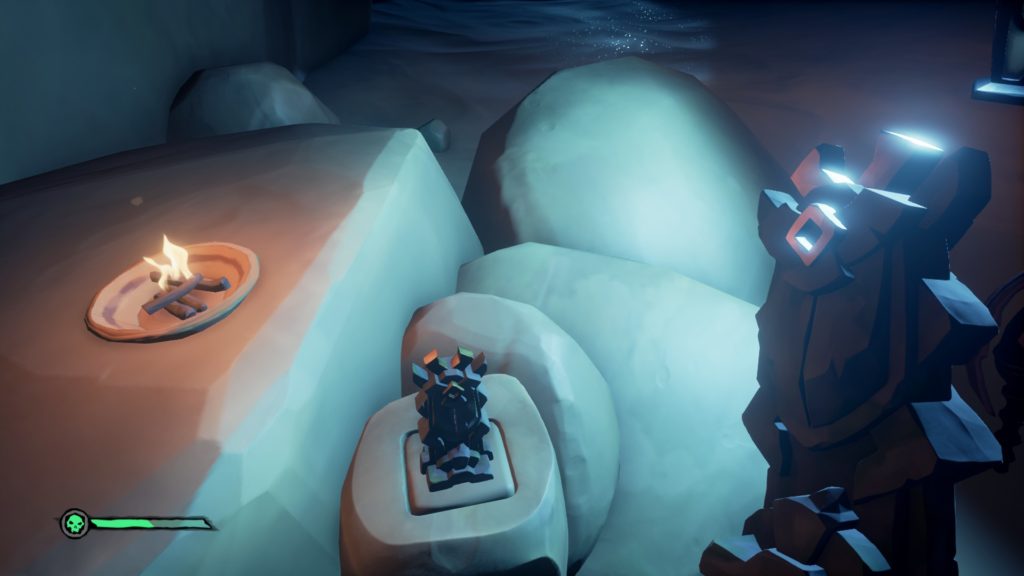
There are 6 types of Totem Keys, which are used as keys to unlock the respective Totem Vaults on Large Islands:
| Totem | Vault | Island | Location |
|---|---|---|---|
| Moon Totem | Moon Vault | Crescent Isle | Inside the Northern side of the Cave system. |
| Snake Totem | Snake Vault | Mermaid’s Hideaway | Under the North Western Arch. |
| Scarab Totem | Scarab Vault | Crook’s Hollow | Southern cave wall close to the waterfall. |
| Boar Totem | Boar Vault | Devil’s Ridge | Amidst rocks on the South East beach. |
| Shark Totem | Shark Vault | Kraken’s Fall | Amidst rocks to the North under the big Arch. |
| Crab Totem | Crab Vault | Uncharted Island (N-13) | In an underwater cave hidden among the coral reefs. |
The Cursed Rogue Riddles
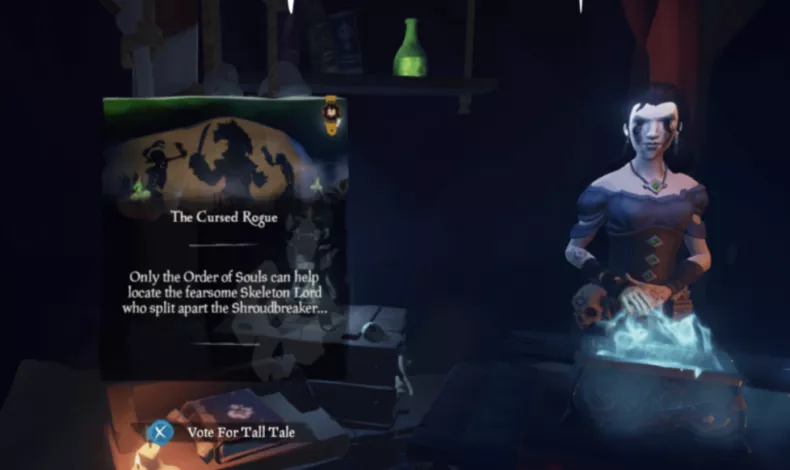
Another fairly simple set of riddles, Sea of Thieves The Cursed Rogue has you chasing the remnants of Briggsy, a Pirate Lord.
To find the Skeleton Key, you’ll need to pay attention to the island pictures in the story. These pictures will be clues about the island where the Skeleton Key is located. The island will be different for every player so you’ll have to rely on the photo clues to help you find the right one.
- “Northern Ancient Isles” – Snake Island
- “Southern Ancient Isles” – Shark Bait Cove
- “Eastern Ancient Isles” – Devil’s Ridge
Head to the corresponding location and you should find some skeletons ready for a scrap (and the aforementioned key, for your trouble!)
You’ll know you’ve found the key’s location when you run into Captain Avery — a skeleton captain who is protecting the key. You’ll have to battle and kill the captain so that he’ll drop the key. Once you get it from him, take it back with you and you’ll be ready to start the next part of the adventure.
Once you’ve got the key, now you need the chest – if you turn the pages of your quest book you’ll find another entry which mentions certain locations (corresponding to landmarks in sketches within the book!) Check out our list to figure out where you need to go.
- Three Maoi heads sketch – Thieves’ Haven
- Bird statue sketch – Plunder Valley
- Rowing skeleton sketch – Crook’s Hollow
The Legendary Storyteller Riddles
Here’s where things get tricky. In The Legendary Storyteller there are multiple riddles which correspond to the childish entries in your log book, and they’re randomized every time you start the mission.

Below we’re going to list the titles of some of Tasha’s tales and the corresponding island you need to go to, hopefully your book matches up!
- Treasure Adventure – K9 (Uncharted Island with shipwreck)
- Fish Friends – Mermaid’s Hideaway
- Baddies Attack – Old Salts Atoll
- Monster Hunting – The Crooked Masts (Shipwreck)
- Naughty Man – Scurvy Isle
- Smallest Boat – Lone Cove
Later on there is another set of riddles when you’re given a plank, but all you have to do is flip the plank to find the exact coordinates where you should head to line up the broken bits – sorry, spoilers!
Stars of a Thief Riddles
Stars of a thief is even more convoluted than the last – with a whole system to explain to understand it’s main riddles. But we’ll get onto that, the first one is fairly simple.
When you first open your log the notes on how to find the Ancient Spyglass will read one or two ways – here’s where to head and dig:
- “Face the North Star” – Rum Runner’s Isle (near a solitary hanging lantern)
- “My back to the North Star” – Twin Groves (beneath a tree between two rocks)
Once that’s sorted things get more complex. The spyglass reveals constellations in the sky which correspond to certain riddle entries – you need to decipher them to find the Star Jewels. We could list it per entry, but we don’t know if we’ve got them all (they’re random, just like in The Legendary Storyteller) so it’s easier to show you how the constellations work.
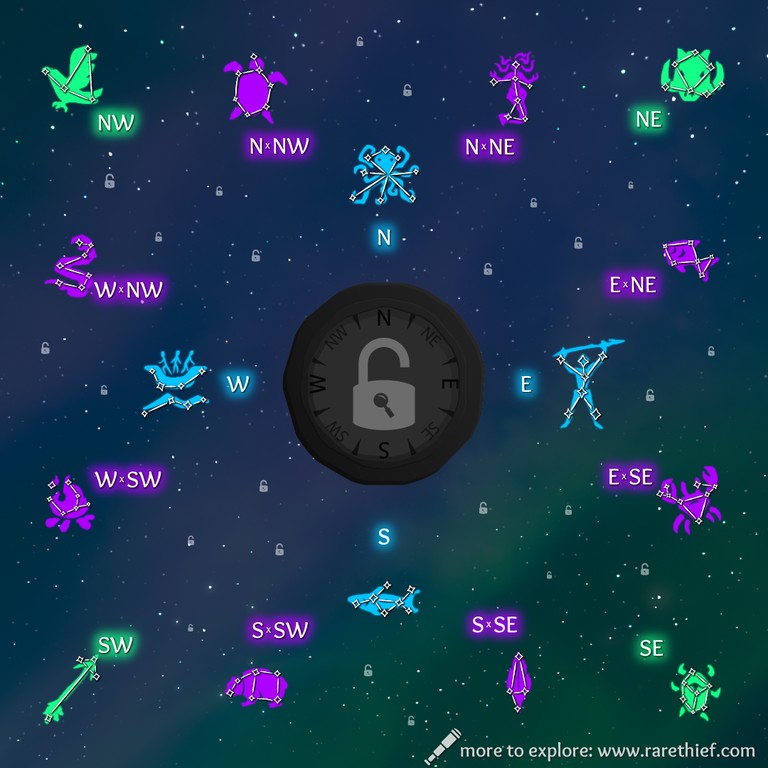
In every riddle we’ve found you get a place location and and a constellation direction to follow. We’re sure you can do the detective work for yourself by simply finding the location in your given entry and following the directions. Here’s what every constellation corresponds to, direction-wise:
- Great Kraken – North
- Sea Queen – North/North-East
- Boar – North-East
- Fish – East/North-East
- Great Warrior/Warmonger – East
- Crab – East/South-East
- Scarab – South-East
- Feather – South/South East
- One-Eyed Shark – South
- Bear – South/South-West
- Arrow – South-West
- Flame – West/South-West
- Boat – West
- Snake – West/North-West
- Eagle – North West
- Turtle – North/North-West
So, for example – if you receive the instructions “Followed arrow to land unmarked” you would find the direction corresponding to the Arrow constellation, and in this case head south-west from your listed location.
Once you’ve got your jewels simply head to the underground cave at N13 to lock them into place and receive the totem which when followed (consult the Totem cheat sheet!) opens the ancient chamber.
Once you’re in there the next riddle section starts, but now you understand the constellation system its easy. In this section, you’ll receive a two stanza poem which is randomized. Though, each line corresponds to the description of each constellation within your textbook. Navigate there and you will be able to infer what each line means. “Warmonger” means Great Warrior, “Old Mother” means Kraken – the list goes on. Once you’ve mapped each line to a symbol, turn the blocks in the chamber to match and you will complete the mission. Phew!
The Wild Rose Riddles
Back to some straight-forward riddle stuff – The Wild Rose has you solving a long-winded puzzle about two lovers. First up it’s going to ask you to find the Chest of Memories via the journal entries in the quest book.
There are three major locations where it can be found and they’re clear as day in the logbook – so head to either Boulder Cay, Rapier Cay or Sandy Shallows depending on what is mentioned in your journal to dig it up.
After you dig up the chest you need to find the mementos – a music box and a spice box which can be transformed into an enchanted compass. It’s another case of randomized entries, so here’s every entry title and its corresponding island:
- Our First Dance – Wanderer’s Refuge
- Our First Kiss – Lagoon of Whispers
- The pig chase! – Salty Sands
- Doing what I do best! – Boulder Cay
- The day we found our pendants! – Sea Dogs Rest
- Day 81 – Lonely Isle
- Our First Bounty – Lone Cove
- The Argument – Twin Groves
- The Perfect Plan – Sailor’s Bounty
- Our Vows – Smuggler’s Bay
- We survived our first ambush! – Cannon Cove
Sometimes there are extra steps that need to be taken – for example, ‘Our First Dance’ has you study their movements to find the exact location of the chest – in every entry there is a sketch of Rose and George standing over a certain location – below them is almost always where the chest is!
The Art of the Trickster Riddles
Back to convoluted riddles, The Art of the Trickster takes you to Plunder Valley to meet Salty the parrot. Once you’ve kicked off the quest head into the nearby cave where you will have to reposition some skeletons to unlock the caged spyglass. Follow the instructions:
- “Captain points to fire and ash” – Make the skeleton point at the fire
- “Hand in hand, two lovers face their destiny” – Make the coupled skeletons hold hands (aw!)
- “The thief hides behind her mask of gold” – Keep interacting with the mask-holding skeleton until they wear it
- “The Rum Runner laid her drink to rest” – Make sure the skeleton who is boozing up is downing their drink
This will drop the cage with the spyglass. Sorted! Now you’ve got that you want to check your quest book again to find the location of markings on either Discovery Ridge or Plunder Valley – for some reason the writers of this book have figured out LIDAR so they’ve made the process easy by marking the skull on each map – simply stand on the point and align the eyes of the broken spyglass on the objects in your eyeline and you will find the key.
The rest of the quest is linear – escape the island and head to Sailor’s Bounty for a skeletal scrap and a ton of traps. Good luck!
The Fate of the Morningstar Riddles
Once you’ve started this mission by heading to the Ferry of the Damned (feed yourself to the sharks!) you will be asked via riddle to head to the highest peak of either Kraken’s Fall or Marauder’s Arch (check the wording in your logbook) and you’ll find a sarcophagus with an Enchanted Lantern inside – which will reveal spooky ghosts!
Once you’ve got the lantern head to Old Faithful Isle – this bit is again very straight forward, follow the footsteps of the Morningstar crew around the island and find the related keys to free them. The only point to note is that you need to use the map behind the trio to find the chest at the end, where X marks the spot on the island is where you need to dig – no other riddles involved.
Revenge of the Morningstar Riddles
Again you’re looking for a shipwreck with secret logs, and luckily this time it is once more in a static location, no riddle required – head to Boulder Cay – the logs are in an underwater shipwreck on the south side of the island – the next part of the quest is a chest which is also found here, underneath a palm tree on the opposite end of Boulder Cay.
Once you’ve donned your fancy new outfit, head to Cannon Cove and kill Captain Gripper for Graymarrow’s Orders – which add a code and a legend to your quest book – there’s no secret to this riddle, all you have to do is match the symbols to the given legend and the game will give you directions to the skull – the answers are laid out for you. We found ours in a cave.
Now head to Sunken Grove, defeat Captain Shaw, grab the orders and decode them for directions to the chalice. Once you get the chalice you might think you’re done, but now you need to have a showdown with Greymarrow. Study your orders once more for the last riddle – there will be a letter and a number surrounded by apostrophes on the penultimate page – ‘Q’ for Cannon Cove and ‘3’ for Sunken Grove – combine them to get Q3, the co-ordinates necessary to find Graymarrow and have your final showdown. Good luck!
Shores of Gold Riddles
At last, it’s time to chart a course for the Shores of Gold – but how do you get there?
Head to the Devil’s Shroud and you’ll end up in this mysterious pirate el dorado.
Once there, you need four tokens from four vaults, with a riddle tied to each. Here’s how to solve them.
- West Vault: Check the middle table from the vault for four circles on the map. Usually you need to go and find the symbols yourself, but this is a guide damn it! From left to right it goes Kraken, Shark, Turtle, Flame.
- North Vault: Avoid the spikes and spin the blocks twice until they’re all the same. The first time you want snakes, the second time you’re looking for the three characters holding up a flame.
- East Vault: Check the ceiling and you should see a Gold Hoarders key formation – simply make that shape out of the blocks and get out of there with the token!
- South Vault: Light the braziers and check your book for the Southern Vault log, you’re looking for the symbols that are only found on each specific pillar, regardless of order. Rotate and grab that medallion!
Once you’ve got the tokens all you have to do is slot them into the southern Compass Vault and the rest of the mission is a linear run through a trap filled chamber resulting in a deadly boss battle with the Gold Hoarder!
Claim your riches, o mighty pirate!