
Baldur’s Gate 3 Legendary items and where to get them
Baldur’s Gate 3 – Act 1 Legendary Items
Blood of Lathander

- Location: Act 1 – Rosymorn Monastery
- Type: Mace
- Effects: Damage – 1d6 +3 bludgeoning
- Lathander’s Blessing – One per long rest, if your HP reaches zero, you restore 2-12 HP; nearby allies also regain 1-6 HP.
- Lathander’s Light – Creates a holy light in a six-meter radius; fiends and undead within the radius are blinded unless they succeed in a Constitution saving throw.
- +3 weapon enchantment
- Spell: Sunbeam
To get this Baldur’s Gate 3 legendary weapon, you must reach the Rosymorn Monastery, part of the overland route that leads to Moonrise Towers. This is also the Githyanki Creche main quest that Lae’zel keeps telling you about. As such, it’s imperative to complete this before you advance too far into Act 2.
In any case, you must solve a puzzle in a secret room, then place the Dawnmaster’s Crest inside the device. This lets you get the mace safely. Otherwise, you have an important decision to make as it relates to Creche Y’llek.
A great weapon for a Paladin or Cleric, this early legendary item can see you through most of the game, especially when facing undead.
Baldur’s Gate 3 – Act 2 Legendary Items
Shar’s Spear of Evening

- Location: Act 2 – Nightsong’s Prison
- Type: Spear
- Effects: Damage – 1d8 + 4 piercing + 1d6 piercing
- Shar’s Blessing – Gain advantage on saving throws while lightly or heavily obscured. Deal additional 1d6 damage to creatures that are lightly or heavily obscured.
- Blind Immunity – The wielder cannot be blinded.
- +3 weapon enchantment
- Spell: Shar’s Darkness
Shar’s Spear of Evening is what you’ll get if Shadowheart kills the Nightsong and it’s perfect if you want a weapon that just generally buffs you when you’re in darkness, but also gives you the ability to create that darkness yourself with its bound spell.
Baldur’s Gate 3 – Act 3 Legendary Items
Selune’s Spear of Night
- Location: Act 3 – Camp
- Type: Spear
- Effects: Damage – 1d8 (1d6) + 5 piercing
- Selune’s Blessing – Gain advantage on Wisdom saving throws and Perception checks.
- Darkvision – Can see in the dark up to 12 meters.
- +3 weapon enchantment
- Spells: Moonbeam and Moonmote
Instead of telling Shadowheart to kill Nightsong, you must pass a dialogue check to make her spare the imprisoned woman. Shadowheart will throw away the Spear of Night, and Nightsong will transform into her winged aasimar self.
Here’s the kicker: you won’t receive this legendary weapon immediately. Instead, you need to rescue Nightsong (again) from the clutches of Ketheric Thorm. Then, at the start of Act 3, Nightsong will tell you more about Shadowheart’s past. She also says that she was able to retrieve the old spear, which has now been blessed by Selune.
Nyrulna

- Location: Act 3 – Circus of the Last Days
- Type: Trident
- Effects: Damage – 1d8 (1d6) +3 piercing
- Zephyr Connection – The weapon returns to your hand when thrown; cannot be forced to drop this via disarming; when thrown, create an explosive blast that deals 3-12 thunder damage.
- Veil of the Wind – Gain a three-meter bonus to movement range and jump distance; makes you immune to fall damage.
- Nyrulna Glowing – Shines with a glowing light in a six-meter radius.
- +3 weapon enchantment
In the Circus of the Last Days, you must pickpocket Akabi successfully so you can win the prize. He knows that you just stole from him, and he’ll teleport you to a small area filled with dinosaurs.
At the end of the path, you’ll find a chest that contains the legendary. Do note, however, that this segment is bugged, and there’s a possibility that Akabi won’t teleport you at all.
Viconia’s Walking Fortress

- Location: Act 3 – House of Grief
- Type: Shield
- Effects: Armor Class – +3
- Rebuke of the Mighty – When hit with a melee attack, use a reaction to deal 2-8 force damage to your foe, knocking them prone unless they succeed in a Dexterity saving throw.
- Spellguard – Gain advantage on saving throws against spells; spell attack rolls against you have disadvantage.
- Spells: Reflective Shell and Warding Bond.
Continue onward with Shadowheart’s companion story. Eventually, you’ll learn of the House of Grief, the enclave of Sharran disciples in the Lower City. Once there, defeat Viconia DeVir in battle, and choose to kill her. You can then pick up this Baldur’s Gate 3 legendary item from her corpse. If you choose to let Viconia leave, you won’t see her, or the shield, ever again.
Note that we did this with Shadowheart having converted to the Selunite faith (i.e. sparing Nightsong and nudging her more to walk the Selunite path). We can’t confirm if the shield can still be obtained with a Shadowheart that has fully embraced her Sharran destinty (i.e. kill Nightsong and nudge her to devote herself to Shar).
Markoheshkir
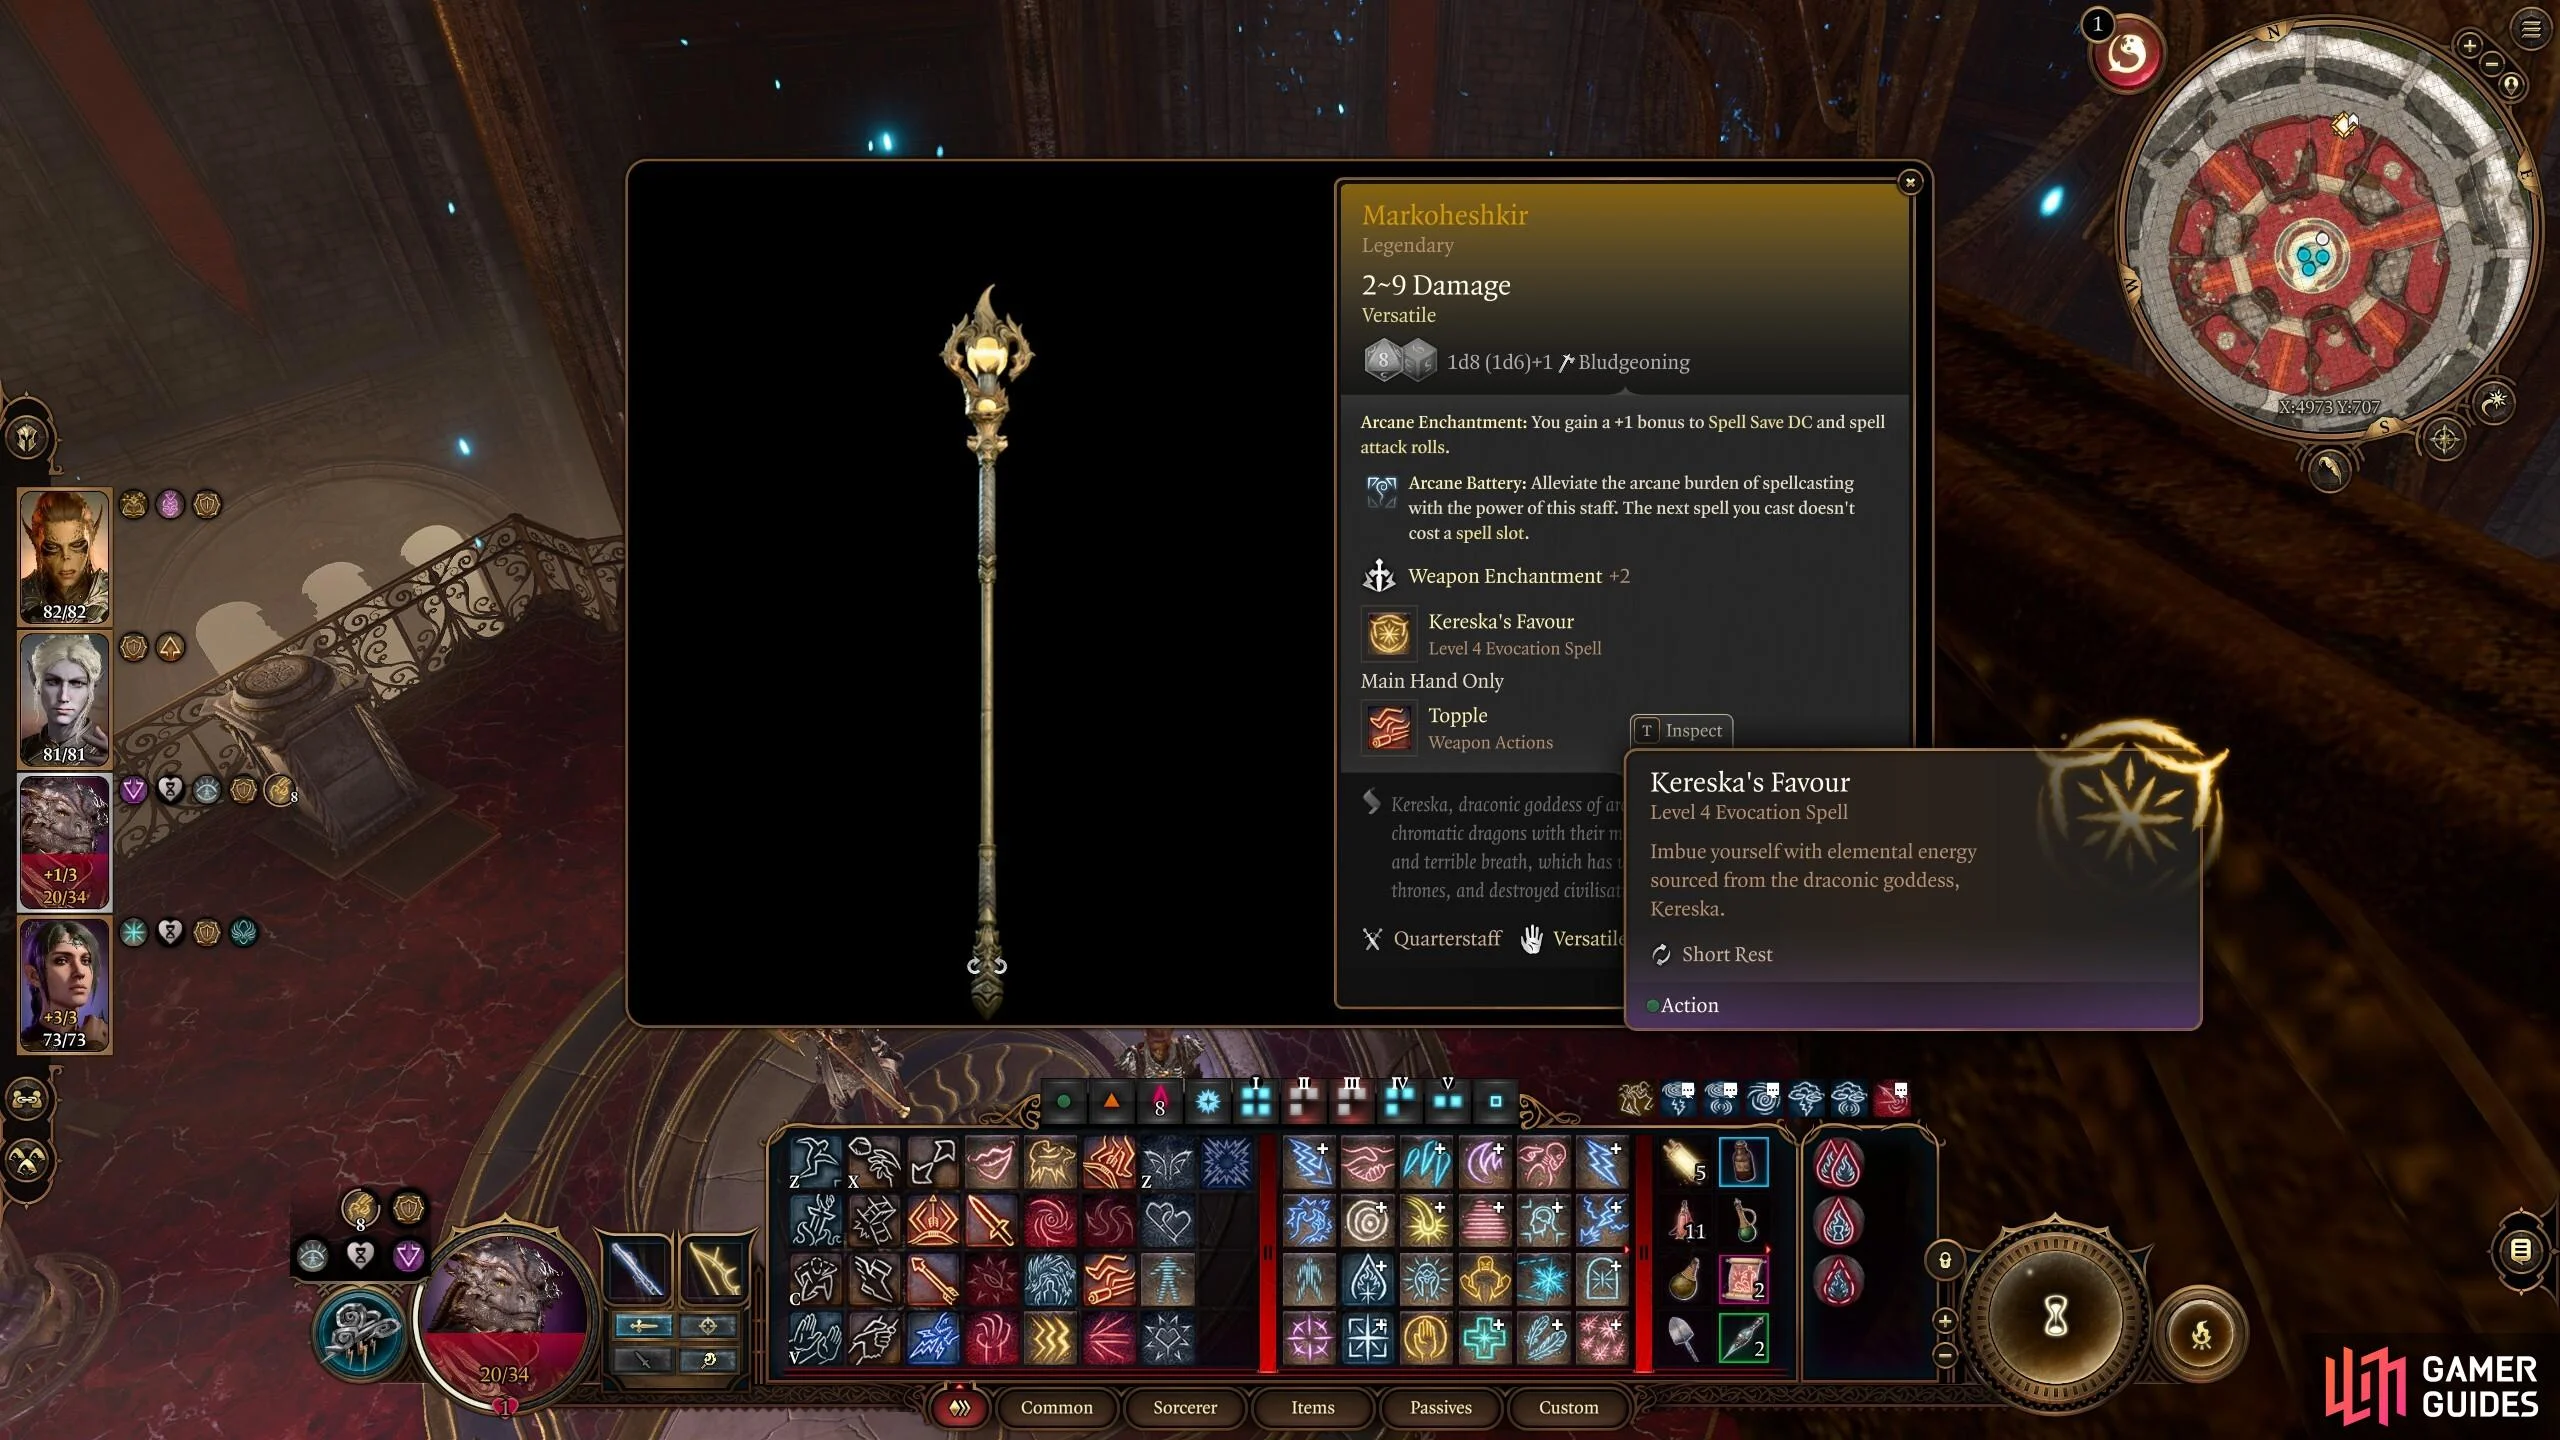
- Location: Act 3 – Sorcerous Sundries/Ramazith’s Tower
- Type: Quarterstaff
- Effects: Damage – 1d8 (1d6) + 1 bludgeoning
- Arcane Enchantment – +1 bonus to spell save DC and spell attack rolls.
- Arcane Battery – The next spell you cast doesn’t cost a spell slot.
- +2 weapon enchantment
- Spells: Kereska’s Favor
This is the continuation of Nightsong’s arc. In the Sorcerous Sundries building, make your way to Ramazith’s Tower, the abode of Lorroakan. You can either hand over Nightsong to this corrupt Wizard, or help him attain his prize.
Either way, you’ll want to check the balcony so you can jump/fly down the lower section. One there, deactivate the arcane barrier to obtain this legendary quarterstaff, as well as a very rare robe.
Duelist’s Prerogative
- Location: Act 3 – The Blushing Mermaid
- Type: Rapier
- Effects: Damage – 1d8+8 piercing, +2 piercing.
- Elegant Duelist – If you don’t have an off-hand item equipped, you score critical hits whenever you roll a 19; gain an additional reaction per turn.
- Withering Cut – On a hit with a melee weapon, use a reaction to deal additional necrotic damage.
- +3 weapon enchantment
- Spells: Challenge to Duel
- Weapon Action: Dueler’s Enthusiasm
This continues the Mayrina and Auntie Ethel arc from Act 1. When you’re looking for a kid named Vanra in Act 3, you’ll realize that she’s been taken by Auntie Ethel. You have to locate Mayrina so she can help you brew a potion that will cause the hag to release the child. Once done, return to Vanra’s mom to receive this rapier.
Gontr Mael
- Location: Act 3 – Steel Watch Foundry
- Type: Bow
- Effects: Damage – 1d8+8 piercing
- Promised Victory – Chance to inflict Guiding Bolt on your target.
- Gontr Mael Glowing – Has a glowing light with a radius of six meters.
- +3 weapon enchantment
- Spell: Celestial Haste
Before you decide to take on Lord Gortash in his chambers, you should definitely disable the Steel Watch automatons. You’ll have to enter the Steel Watch Foundry in the southwestern portion of the Lower City. A Gondian NPC will help you along the way. In the inner recesses, take out the Steel Watcher Titan and loot it. Make sure you pick up the weapon before you tell the NPC to blow up the facility, or it will be inaccessible.
Balduran’s Giantslayer
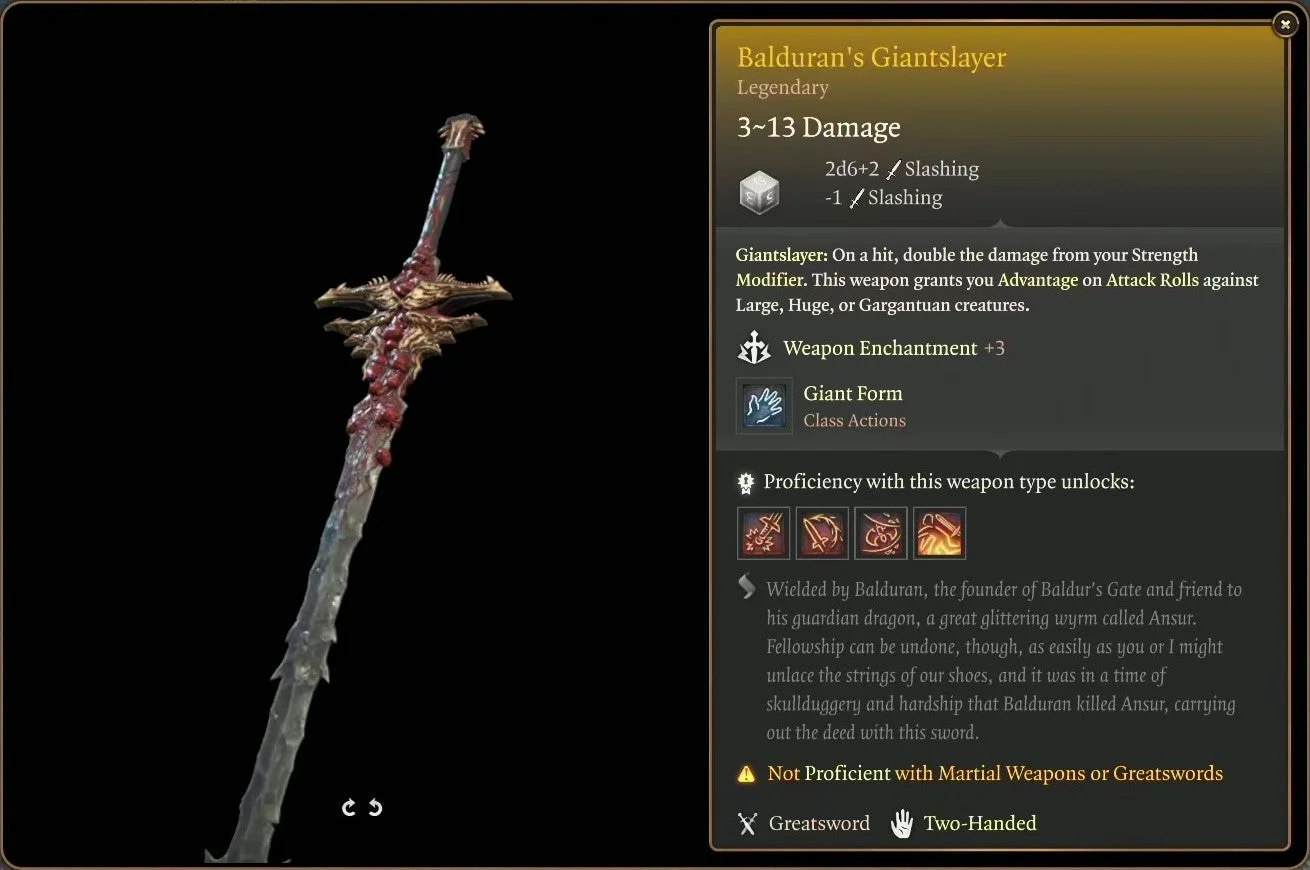
- Location: Act 3 – Wyrmway
- Type: Greatsword
- Effects: Damage – 2d6+3 slashing
- Giantslayer – On hit, double the damage from your Strength modifier; gain advantage on attack rolls against large, huge, or gargantuan creatures.
- +3 weapon enchantment
- Class Action: Giant Form
After saving Duke Ravengard and escaping the underwater prison, you’ll learn of a hidden lair deep below the city. Once you complete all the trials therein, you’ll battle the enraged dragon, Ansur. Beat him and loot the weapon.
Helm of Balduran
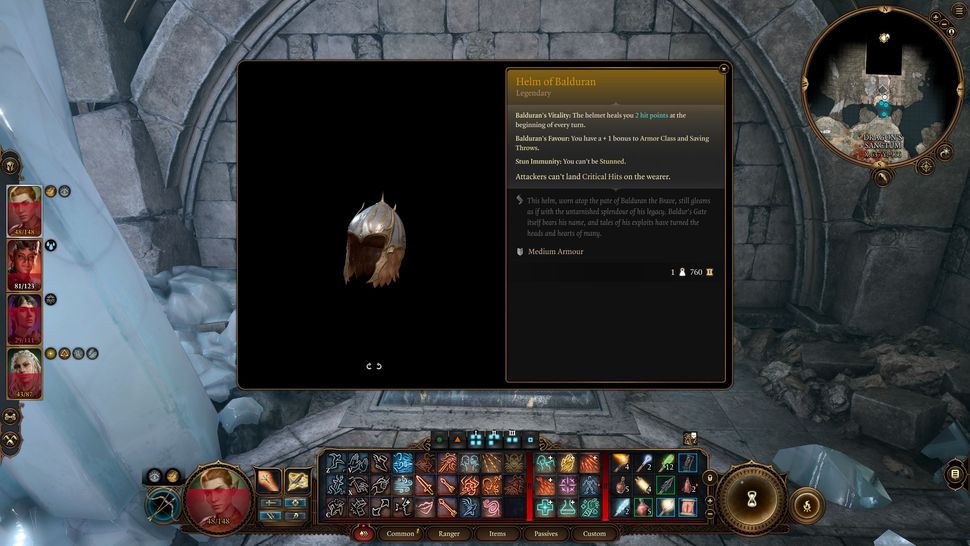
- Location: Act 3 – Wyrmway
- Type: Helmet (medium armor)
- Effects:
- Balduran’s Vitality – Heals you for +2 HP at the beginning of your turn.
- Balduran’s Favor – +1 bonus to AC and saving throws.
- Stun Immunity – The wearer cannot be stunned.
- Attackers cannot land critical hits on the wearer.
Similar to the above, you need to defeat Ansur. Once you’re done, check the altar at the back to pick up this Baldur’s Gate 3 legendary item. It also reveals a hidden passageway back to the prison area.
Crimson Mischief

- Location: Act 3 – Temple of Bhaal
- Type: Shortsword
- Effects: Damage – 1d8+7 piercing, +1d4 necrotic, +1d4 piercing
- Prey Upon the Weak – Deals +1-4 piercing damage against targets with less than 50% HP.
- Redvein Savagery – As a main hand weapon, make an attack with advantage to inflict an additional 7 piercing damage against your target.
- Crimson Weapon – As an off-hand weapon, make an attack to add your ability modifier to the damage roll.
- +2 weapon enchantment
Head to the Lower City Sewers and go through the Undercity Ruins. Eventually, you’ll encounter Orin the Red in the Temple of Bhaal. Defeat her and loot her corpse for this gear piece.
Bloodthirst

- Location: Act 3 – Temple of Bhaal
- Type: Dagger
- Effects: Damage – 1d8+2 piercing
- Improved Critical – The number you need to roll to do a critical is reduced by 1; can stack with other similar effects.
- Exploit Weakness – As a main hand weapon, enemies hit with this receive vulnerability to piercing damage.
- True Strike Riposte – As an off-hand weapon, enemies that miss you with a melee strike allow you to counter to gain True Strike; gain +1 AC.
- +2 weapon enchantment
- Cantrip: True Strike
- Feature: Bound Weapon
This Baldur’s Gate 3 legendary weapon is also dropped by Orin the Red. It was previously known as the Netherstone-Pommeled Bloodthirst before the name was shortened.
Orphic Hammer

- Location: Act 3 – Sharess Caress or House of Hope
- Type: Warhammer
- Effects: Damage – 1d10 (1d8) + 3 bludgeoning
- Spell Resistance – Advantage of saving throws against spells.
- +3 weapon enchantment
- Class Action: Unshackling Strike
This isn’t so much a legendary that’s often used in combat, as it is an integral item due to several related quest. You can obtain this either by agreeing to Raphael’s proposal, or by stealing it in the House of Hope. It’s also the only item that can destroy the crystals that shackle Hope and Orpheus.
Helldusk Armor
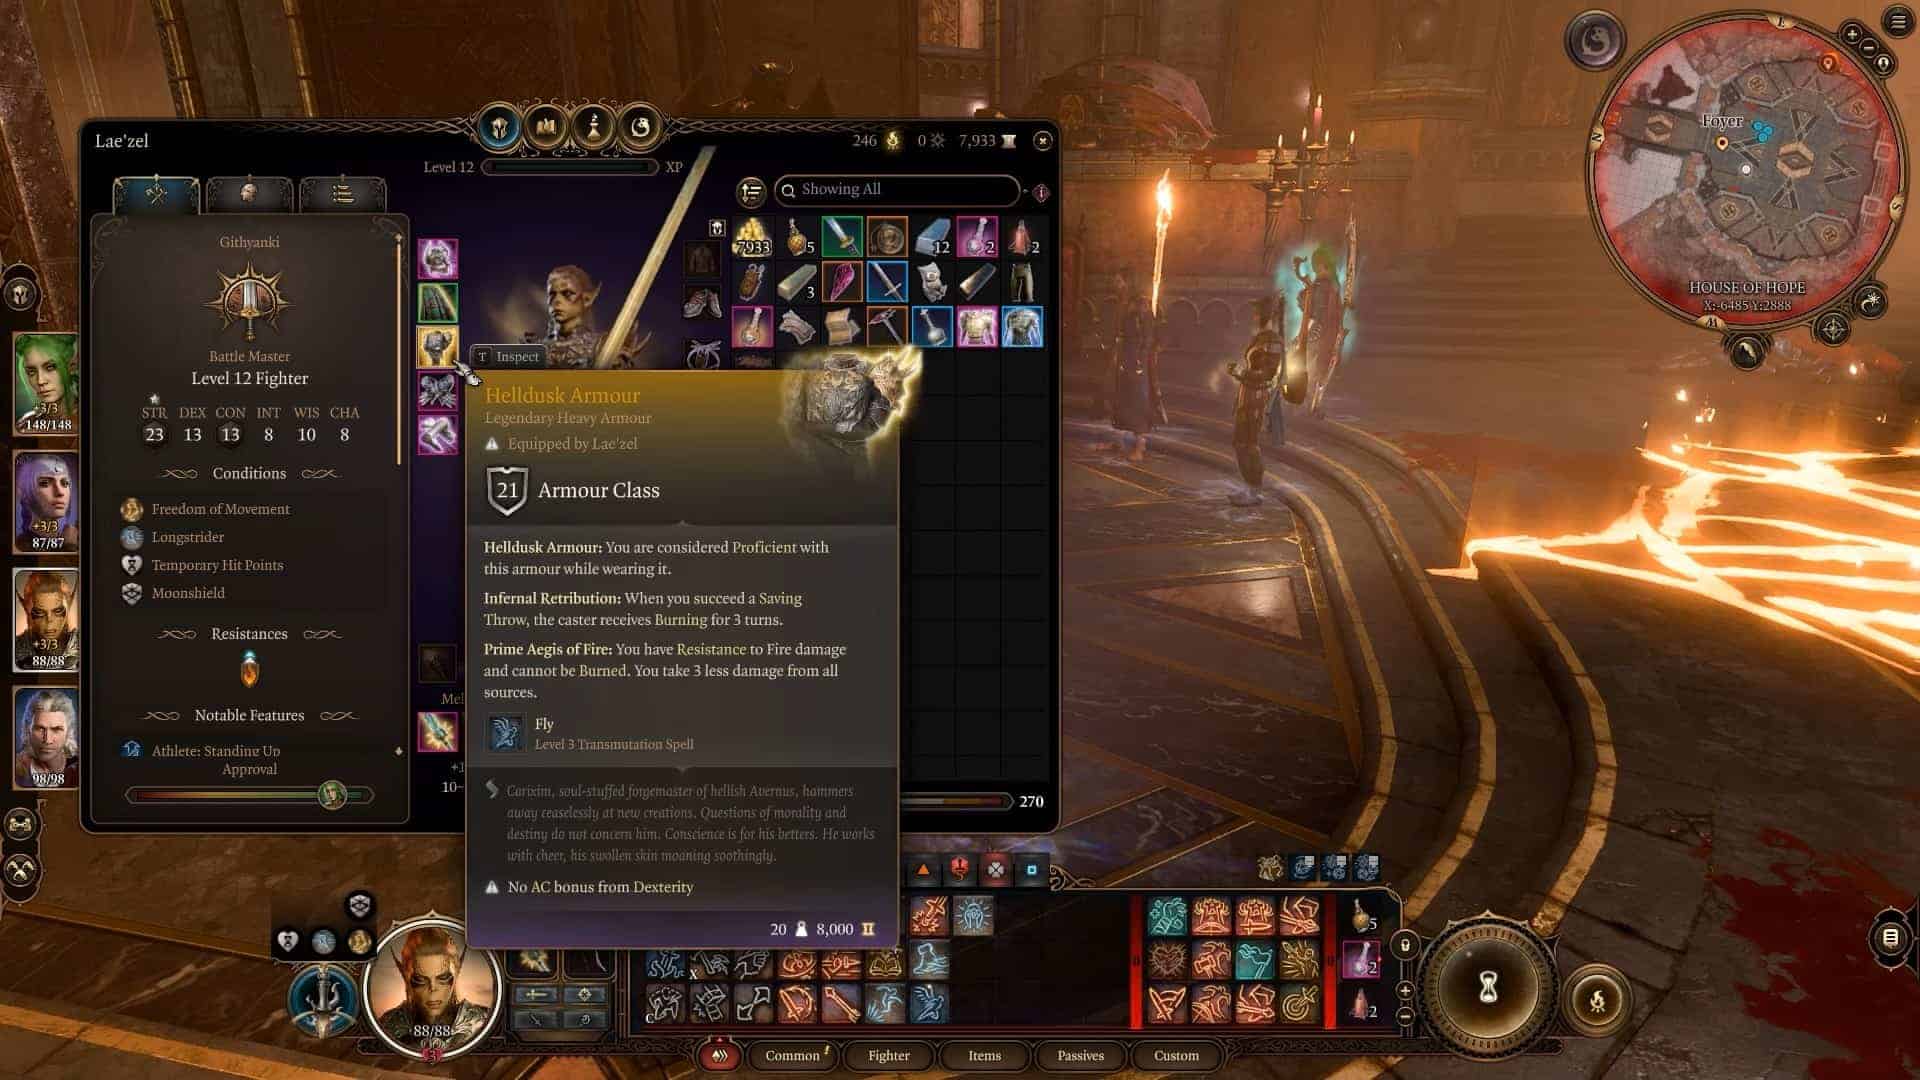
- Location: Act 3 – House of Hope
- Type: Chestpiece (heavy armor)
- Effects: +21 armor class
- Helldusk Armor – The wearer is automatically proficient with this armor.
- Infernal Retribution – When you succeed in a saving throw, the caster is afflicted with burning for three turns.
- Prime Aegis of Fire – Resistance to fire damage; cannot be burned; take 3 less damage from all sources.
- Spell: Fly
This might just be the best Baldur’s Gate 3 legendary armor due to its inherent effects. Any character can wear it, which means there are no class restrictions (i.e. Gale can wear this and still cast spells). The only challenge is that you have to enter the House of Hope and defeat Raphael. He’s got 666 HP, as is befitting of a devil, so be ready for a tough battle.
Gloves of Soul Catching
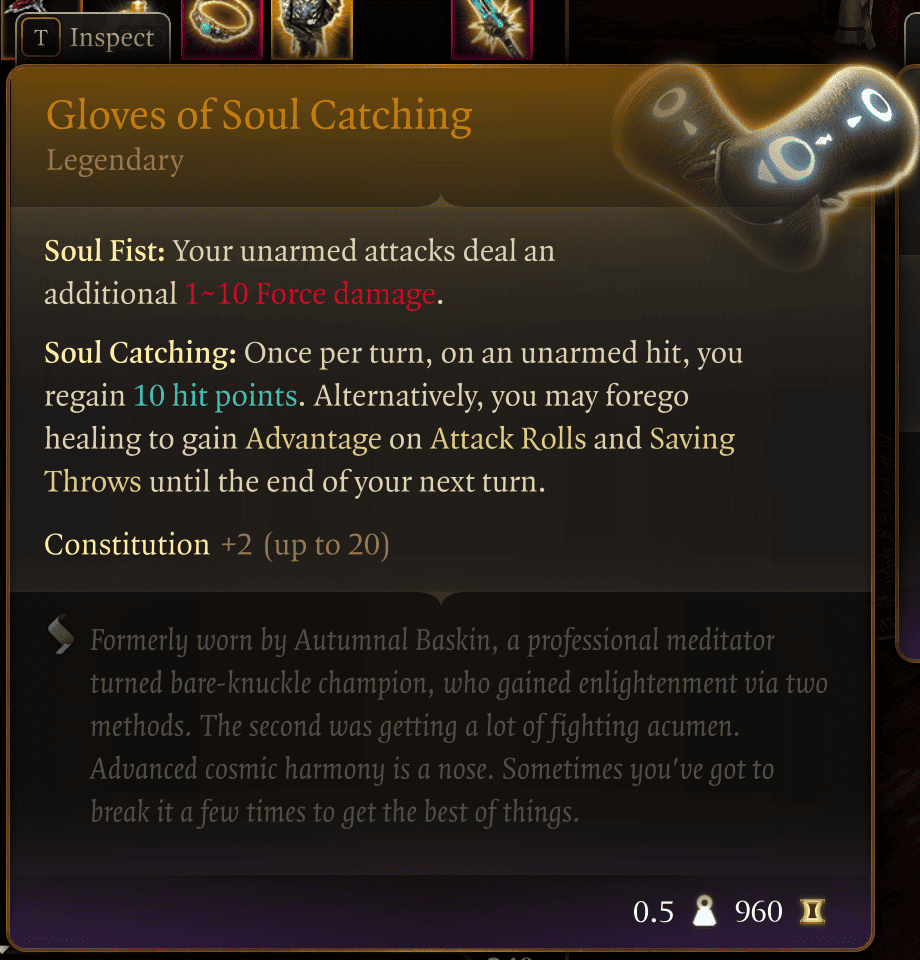
- Location: Act 3 – House of Hope
- Type: Gloves
- Effects:
- Soul Fist – Unarmed melee attacks deal +1-10 force damage.
- Soul Catching – Once per turn on an unarmed hit, restore 10 HP; you may also forego the healing to gain advantage on attack rolls and saving throws until the end of your turn.
- +2 Constitution (up to 20 cap).
This is yet another awesome legendary gear piece from the House of Hope. The key factor here is that you should also use the Orphic Hammer to free Hope from her prison, which you can reach via the hatch. From there, attempt to make your escape, and defeat Raphael once he spawns.
Gontr Mael
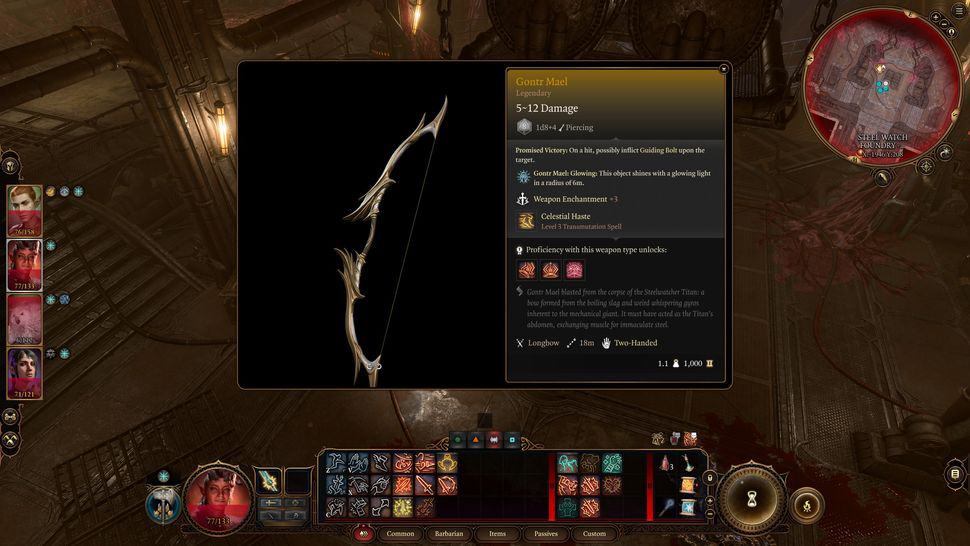
- Location: Act 3 – House of Hope
- Type: Bow
- Effects:
- Promised Victory: On a hit, possibly inflict Guiding Bolt on the target.
- Gontr Mael glowing: This object shines with a glowing light in a radius of six meters.
- Bound spells: Celestial Haste
You can get the Gontr Mael Legendary bow by defeating the Steel Watch Titan boss in the basement of the Steel Watch Foundry in the Lower City. You have to do this as part of killing Gortash and getting his Netherstone during Act 3, that is, if you don’t want to have to deal with giant robots at the same time as fighting him.
The boss is quite tricky, since you’ll also have to fight multiple Steel Watchers at the same time, but once it’s beaten you can loot this bow from its corpse.
Bonus Legendary Items
Shapeshifter’s Mask
- Location: Camp
- Type: Helmet
- Effects: Adds the Shapeshift spell to your action bar when equipped.
You need to purchase the Deluxe Edition if you want to have this helmet. You should then find it in your stash when you go to your camp. The Shapeshift spell mostly changes your character’s race appearance. This lasts until your next long rest, or when you click on the Dispel Disguise button at the right-hand side of your action bar.
Devotee’s Mace
- Location: N/A (Cleric-only spell)
- Type: Mace
- Effects: Damage – 1d6+2 bludgeoning; +1d8 radiant
- +3 weapon enchantment
- Healing Increase Aura – Regenerate 1-4 HP at the start of your turn; lasts 10 turns; requires a long rest to be recast.
This requires a level 10 Cleric to cast Divine Intervention – Arm Thy Faithful, which causes the mace to appear as an item. However, be forewarned that Divine Intervention is a one-time-use spell, which means you can only cast it once throughout the entire campaign. We normally don’t advise using Divine Intervention in this manner since Sunder the Heretical and Opulent Revival are more viable when you’re in the middle of tough fights.
Still, if you really want one, we suggest getting a Cleric hireling to cast the spell, as opposed to having Shadowheart do that (as she’ll likely be a mainstay in your party). Or you can use Hope. You can then move the Devotee’s Mace to someone else’s inventory. So far, we’ve tried dismissing the hireling and doing a couple of long rests, and the item can still be equipped by other party members.
In any case, these are the legendary items in Baldur’s Gate 3 that we’ve discovered so far. There might be a few others, so we’ll update our guide if need be.
Baldur’s Gate 3 is filled to the brim with activities and secrets. You’ll no doubt be part of an adventure that can take countless hours to complete.